Sunday, September 28, 2014

Whimmydiddle 2014

I was so thrilled to be part of the 2014 Whimmydiddle craft fair in Scott City, KS this year. I went into this fair as a rookie, and I learned so much.

The items I have made in the last year have mostly comprised of projects I planned around the stash of yarn I had on hand or what has been given to me. Because I wasn't sure what types of handmades would be popular, I made a wide variety and watched what was touched, talked about, purchased, and even taken selfies with!  I feel I now have a more focused idea of what customers in that area are looking for. 

The Whimmydiddle is a one-day fair. My parents live about 6 blocks away, so I didn't have to sleep at the park in my tent or get a hotel room, which was great. I went down 2 days before hand, sifted through baskets at Mom's, and planned my booth layout. On the day before, I checked in, was given my spot assignment (which was a good spot - under a tree and with the wind at my tent's back), and set up my tent and tables. I waited for the morning to set up my merchandise and details. 

So at 7 that fair morning, I arrived at the fair and quickly realized that there was nowhere to park my trailer to unload my crates. My dad and husband helped me immensely- and we carried everything all the way across the park.  By lamplight, we set up and arranged everything. 
Here was my booth just after finishing setup. As you can see, I took my small loom to demonstrate weaving. I really tried to be weaving nearly all the time, so no one would miss it.  I had SO many comments, questions, and attention while weaving. It was great to show people something they had not seen before. I was also surprised by the children and men who were interested in my crafting. I love sharing my loves with people, and showing the art and detail that handmade items require hopefully raises appreciation for handiwork.

We also brought in my aunt Cindy's alpaca fleece. 
In the blue tubs beside Chris, we had raw fleece from four different alpacas, in different colors. It was fun to teach people more about alpacas and allow them to feel how soft their fleece is. 
I feel that there was not enough height to my display, and that more mannequins would have been nice. Many items are hard to imagine in use. A hand mannequin would be nice too!

By the end of the day, my back was sore from my weaving, I ran out of weft spools, and we were dusty from the wind. But we tore down, packed up, and drove the 6 hours back to Oklahoma that night. It was a long day, but I met some nice people, had fun, sold some stuff, and learned a ton. I'm already planning next year's fair!  

Saturday, September 20, 2014

Folding my Voyageur

I have really loved my 15", 8 shaft Leclerc Voyageur table loom. There are so many possibilities with the added shafts, and it doesn't take up much room. 

Today, however, I needed to have it fold - one of the reasons I got this loom. I'm taking it to Kansas with me to demonstrate weaving at the craft fair.

I started by warping and beginning the weaving. I wanted to have it ready to weave on the body of the project, but also I wanted to familiarize myself with the pattern so if I was distracted or pulled away from the loom, I would know right where to start again. 

Steps to folding a Leclerc Voyageur 

Step 1: loosen the warp to allow for the folding and remove any weights on floating selvedges or previously broken warps.  
Step 2: loosen any red screws
Step 3: fold up the front arm, allowing the beater bar to rest vertically between the castle and front beam. 
Step 4: place the securing bars from the front beam onto the loosened red screw near the top of each side of the castle and tighten down.
Step 5: lift up the rear beam and place the securing bars onto the red screw on the lower part of the front beam. Tighten to secure. I found that I needed to raise shaft 8 to keep my current large warp from interfering with the frame of the 8th shaft. 
Step 6: tighten down all screws
Step 7: remove the handles from both the front and back beams and secure the beam with the provided screws. 
Step 8: place the loom into the bag. 

I'm now ready to travel with my loom, so wish me luck!

Friday, September 19, 2014

3 Color Pinwheels

I ran an experiment with my table loom - I wanted to see if I could feasibly use some of this huge supply of acrylic yarn I have to make a woven scarf.  I picked three colors: gray, blue, and red and came up with a draft:

I use iWeaveIt program that I have on my phone and iPad.  It allows me to make my own drafts and use ones from weaving databases like handweaving.net.  Once I'm done modifying it, I then can either print a copy to have by the loom to use as reference, or actually use my device and track my progress - helping me to never lose my place.  (Ha.  I have two kids.  Like I never lose my place!)  I can also pick my colors, which allows me to see how the colors will interact.  It's very handy.

I never took any pictures of this on the loom :(.  It wove up very quickly, and I deem it a soaring success.  I'll be using more stash to make more scarves soon.  Here is the finished product:


Isn't it pretty?!  May be one of the nicest things I've made with acrylic! 

Honeycomb Baby Blanket

With my rush to finish fair items, I totally skipped over telling you about this project I finished.  It's not that I deem it less worthy, really.  :( Poor blanket.  Anyhow, it was very satisfying to finish this blanket.  It really was fun to knit.  Sometimes knitting blankets can be tedious because of their size, but this one never seemed to drag on.

The nice thing about it is its simplicity.  I used 3 colors of Red Heart's Baby Yarn, which has been discontinued.  Now I readily concede: I really hate Red Heart.  That statement could probably be truthfully expanded to include all acrylic yarn.  But I do admit it has its uses.  Acrylic yarn is the least expensive.  It is completely synthetic (think PLASTIC), so is machine washable and dryable - which is ideal when you're making kids' items.  It's always available in lots of colors, and can be found even at Walmart.  My mom ALWAYS works with it.  I think I'm a yarn snob *insert slightly guilty feeling*.  My grandmother gave me a TON of this yarn to use.  Waste not, want not - right?


But anyway, I'm off my line of thought.  3 colors of Baby Yarn: pink, blue, and a variegated white/pink/blue.  I decided to use the pink and blue as alternating honeycomb colors, and utilize the variegated to be the border of the combs.  I like it. 
I hesitated at first to make a blanket that included both pink and blue - because a lot of people feel firmly that pink is for girls and blue is for boys.  But let's stretch our imaginations, people.  My favorite color is blue.  I'm a girl.  And this combo of colors could be used for either sex!

Now, the honeycomb may look like a detailed stitch pattern, however it is simply slipping 2 stitches of the honeycomb border past 6 rows of the pink or blue honeycomb "body", if you will.  When the next border is started, you just knit across, finishing off those slipped stitches.  It's fun but not complicated.  I didn't need a pattern.
 
I had a sizeable blanket after using most of a skein of each color, and decided to move on to make a border.  As I was knitting this, I really wished I would have built a border onto it as I worked - by starting with 10 rows of garter stitch at the beginning, ending the same way, and putting 10 stitches of garter at each side.  But hindsight is 20/20 - so I needed to add a border after finishing it.  I decided to crochet.  There are enough crochet stitches in it to make the border wavy.  I finished the last row of the border with THIS MUCH yarn remaining!!!  SKIN of my TEETH!
Here are more finished pictures:


I'd like to make more blankets like this.  Wouldn't rainbow colors be cool?

In the meantime, I am not beginning another knitting project for now.  I have about 10 more rows before I finish my son's Spiderman blanket.  I hope to be project-less in time for the WHIMMYDIDDLE in 8 days!!!  I've started gathering all the stuff I need and I'm getting excited (with butterflies, of course!)

Tomorrow I'll post one more project completion - a weaving one!

Have a great day!

Sunday, September 14, 2014

Fair Success

I decided to enter 7 handmade items in this year's Oklahoma State Fair.  I've never entered items in the fair before, but have always wanted to. Now that we live in the city with the fair, it's easy to do - so I gave it a shot.

Drumroll please......

This is my Striped Stardust Shawl. Fifth place (Cape or Shawl category). 
My Stadium Cushion. Second place (Weaving Article not otherwise specified category). 
Above are my Kitchen Towels I just finished. First place (Woven Household Linens category). 
Above is my KU Stadium Blanket - second place (Woven Blankets, Throws, Coverlets and Afghans category).  Note that pretty pinwheel scarf next to my blanket.  They did a great job!
Here is my Fall Colors Scarf - sixth place (Knitted Scarves category).  There sure were a lot of scarves on display.
This photo is hard to see - the gloves were hanging on a Christmas tree in the corner of the display, but it's my Knotty Gloves - second place (Misc Knitted Clothing category). 
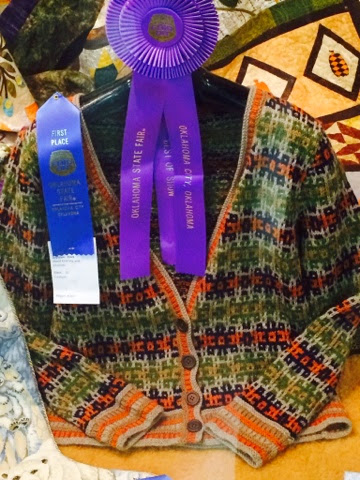
And the best for last - my Earth Tones Cardigan won first place (Knitted Cardigan category) and Best of Show Knitting Apparel!  I was so excited!!  This cardigan gave me ulcers (figuratively), but now I guess I'll forgive it!


Here's me by my sweater. Chris and I took an evening without kids to explore some of the fair. But of course I bee-lined for the creative arts building. They had promised to post results online nearly a week ago but have not, so the suspense was killing me!!

This competition is a great affirmation of the work I've done this year.  I wish I knew how many of each item were entered into each category, but all they tell me is that they'll guarantee items thru 10th place will be displayed.  Regardless, it gives me something I've been missing: outside assessment of these items.  I've been very unsure heading into this craft fair, not knowing if I can do it, or if my items are up to snuff.  I'll sure try to make this an annual thing. Maybe I can improve with my weaving and win best of show in a weaving category next year!  I also walked by some canning, produce, kids' legos ... all things I could shoot for next year.  We'll see!

Now I have some ribbons to measure up to Chris's winnings in BBQ competitions this year.  Nothing wrong with a little friendly competitiveness, right?! We both enjoy our hobbies and it's so fun to participate and see how you do in these competitions.

Wednesday, September 10, 2014

Adding length and color stripes!

I'm quickly coming up to the craft fair, so I'm beginning to transition from making items to preparing for the show.  As such, I decided to make one last quick rug.  I'm sure they will be a popular item at the fair.  This time, I decided to make a longer, skinnier rug - one that would work well in front of sliding glass doors or down longer hallways.  I wrote up a plan to make a 90" rug.  I do all my math, and start weaving.

It's looking great on the loom, but as I'm weaving the middle section (the part after the white stripe), I notice that it doesn't seem like I have much more warp on the beam.  I think I'll run short.  I planned to weave 64" in that middle section, but after I get just beyond 50", I decide to go ahead and stop and make the next stripe.  I'm so glad that I did, because I quickly ran out of weaving room and ended up hand-picking the last few throws through a teeny-tiny shed because I had run out of warp.  Luckily, I was able to fit it all in.  In retrospect, I realized my math error came from not taking into account how far over and under the weft the cotton warp travels, thus eating up length.
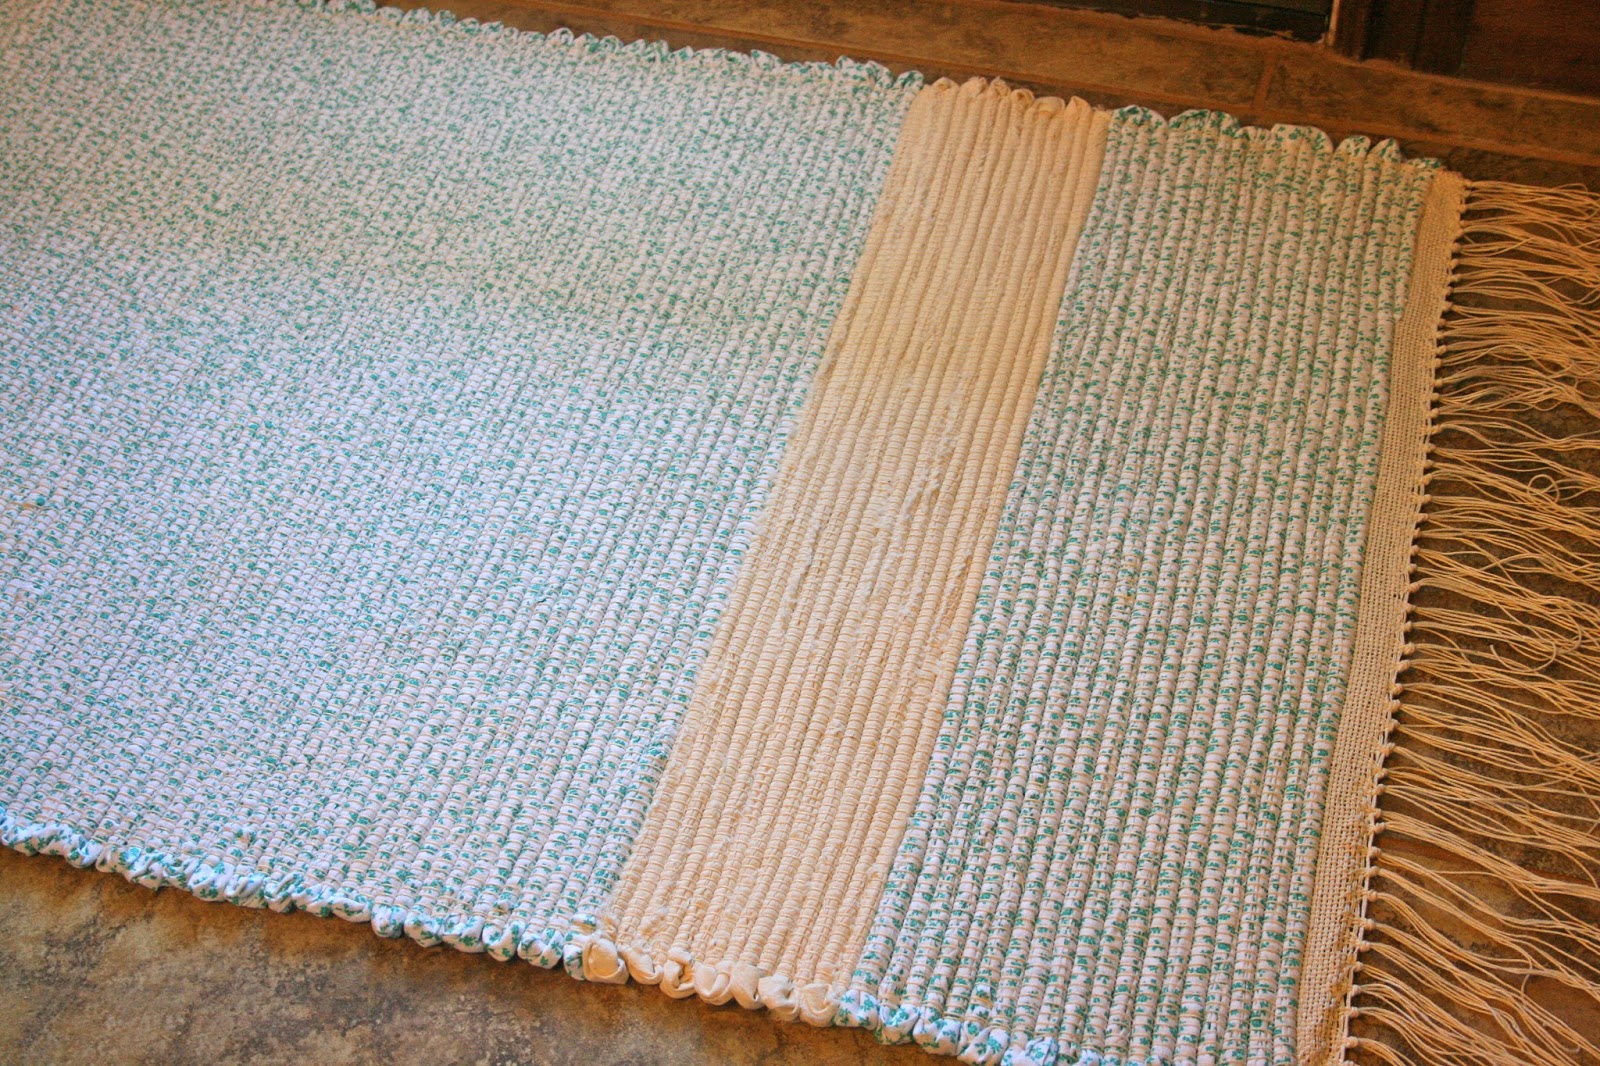
Here the rug is in front of my double doors.  The length still works nice. The final dimensions ended up being 69.5" x 25.5"
 My dog, Buddy, insisted on being in this shot.  I got a belligerent glare when I told him to move! :)

 The cotton fabric in this rug is small green shamrocks on a white background.  Hard to tell that, huh?  The cream stripes match the natural cotton warp perfectly, and add a nice contrast.  Some visual interest, if you please.  The shamrock fabric had been sewn into a tube, so there were no rough edges.  It wove nicely.  The cream fabric was raw, a 2" strip with frayed edges.  You can see that in the photo below.  I think it gives a rustic look.

I think my beat is getting better in the rugs.  I've decided muscle is the best bet, and also, focusing on the throw before the one you are beating in, ensuring the foundation is beat in well.

I've been collecting worn out t shirts from family, and I'm hoping to do some colorful t shirt rugs soon.  Maybe even get some colorful cotton warp!  But for now my big loom stands empty, allowing me to spend my energy getting ready for the craft fair.  Wish me luck!

Monday, September 8, 2014

Doubleweave Placemats

This here was a daunting project.  I chose to weave these placemats after seeing their pattern in Handwoven Magazine.  I had just enough weaving space on my table loom, so I got going.  As I've blogged about before in my "Rebeaming" post, I had SO much trouble getting this project on the loom and ready to go.  First I had the beaming issues, where I also had several warp threads break, I miscounted heddles and ran short, and then I had beating issues... UGH.

Finally, with the help of weaving instructors from Handwoven Magazine, I discovered that the problem with the beating was that a table loom cannot beat in firmly, as this pattern required.  So, I ended up with my EPI (ends per inch) being half what the original pattern called for.  After staring at it for a long time (and ignoring it for longer), I came to the conclusion that there was no way in H-E-double-chopsticks I was going to undo all and scrap the project.  So I recalculated the repeats based on my EPI, and hoped it would come out in an acceptable placemat-like size.  As you can see, it did!  Here is the cloth beam just as I was finishing.  So rewarding to have a nice hefty roll of cloth that you made yourself!

I was so enamored with doubleweave after my previous project, my Stadium Cushion, that I just HAD to try another project.  These are reversible, one side of the weaving is white with yellow stripes and one side is blue with yellow stripes.  As you switch the layers, the colors reverse positions.  It's so much fun to do.  Hard to describe, but trust me.  Here is a shot of the back side of the placemat, blue dominant.

So cool.  But I'm ahead of myself.  Let me tell you a little bit more about how I finished them. After I fixed all my issues and finished weaving four placemats, I was left with a long stretch of fabric that looked like this:
I then cut the placemats apart at the pink divider line...
...and then zigzag stitched to hold everything in place.

The yellow wefts were not worked in or carried, so I had to weave them in after the fact.
Now because doubleweave, in this application, creates a tube-like structure, I was able to sink the seams into itself and form a nice finished edge.

I then pressed them and began hemming. I hand sewed the weft from one side to the corresponding weft from the other. It took a while, but the finish is very seamless.
But here is the finished product!
I love that you could mix it up and have some be white and some be blue.  And if you spill something on one side...just flip it over!  Problem solved!  :)


I learned more on this project than any other to this day.  All my headaches were certainly worth it and I'm happy to say I didn't give up!