Ok, I'm guilty. These have been done for quite a while, but have been sitting on my chair-side table for a month waiting to be hemmed. I've discovered I don't much care for hemming....
Since the idea of weaving entered my mind, I wanted to weave kitchen towels. I don't know why, but I love dish towels, tea towels, whatever you call them. Having towels that dry well, are soft and supple, and gentle on your dishes makes such a difference. So I decided to weave some! I started off with unmercerized cotton. Mercerization of cotton involves exposing it to a sodium hydroxide bath, which is then neutralized by an acid bath. This treatment increases luster, strength,
affinity to dye, resistance to mildew and shrinkage. Mercerized yarns
more readily accepts dye and hold the color longer. In the weaving world, this is called perle cotton. While there are many benefits to mercerized cotton, ABSORBENCY is what is sacrificed in the process. And we all know absorbency is what we need in a kitchen towel.
So here is my UNmercerized 8/2 cotton, before I wound the warp. I chose 2 colors: natural and a pretty "china blue".
I wanted to make these towels plaid-like. I designed a pattern, wound the warp, and dressed the loom. I wanted to try different treadling patterns for each towel. I looked through my weaving pattern directory and found 4 to try.
Once I finished the first towel, I placed 4 throws of a contrasting yarn, and proceeded with the next towel. The next pattern was an extended zigzag. This one was a lot of fun to weave.
Up close on the zigzag.
I didn't take pictures on the loom of the remaining two patterns: but I did a Bell Celtic pattern and then Hopsack.
Here are the towels right off the loom!
Next up was separating the towels. I performed a machine zigzag stitch on either side of the pink dividing yarn to secure the warp and wefts...
And then cut. I tell ya, that is unnerving. I think I was praying the whole time that the stitching would hold!
I decided to hem the towels by hand. For some reason, the tension on my machine was acting up, and I wasn't confident that the hem stitch from the machine would look alright. Plus, I was wanting to do as small a hem as possible, and Lord knows I'm not a good enough machine sewer to keep that hem in place as it moved through the machine. Thus, enter the unhappy task of hemming.
Once it was (finally) done, I washed them up by hand, dried them in the dryer, and then pressed them. Check out how much the pressing helped!
Here is the finished product(s). I'm so pleased with them. I made them to be sold at the craft fair coming up, but I really am going to have a hard time letting these go. They look so absorbent and feel so soft, I know they'll be a cherished piece of someone's kitchen someday!
And a special shout-out to one of my partners-in-crime, who helped with the photo shoot! :)
Due to the popularity of these towels, I've scanned and linked the copy of my weaving record sheet which will give you instructions on how to make your own. If you have any questions or can't read my writing :), message me.
CLICK HERE TO VIEW PAGE 1
CLICK HERE TO VIEW PAGE 2
Saturday, August 30, 2014
Thursday, August 14, 2014
A baby blanket for a special couple
We have friends that we met while my hubby Chris was in his master's program at KU. They are the nicest people, and even though they live in Texas, we try to get down there to see them once a year. This year, they welcomed their first child into this world, and we were thrilled for them. Chris asked me to make them something for the baby to use. Here's what I came up with.
I'd seen a lot of really stunning blankets using a single our dual colored warp combined with a variegated weft, so I decided to give it a try. I found this beautiful colorway (Agua) in Manos Del Uruguay Maxima (100% wool, single ply) :
and found two colors of 3/2 cotton to match. In retrospect, I would have picked two colors that were slightly more different, because I think it's hard to see the difference between the blue and teal. But it's still pretty!
I was shooting for a 40"x40" receiving blanket size, but inadvertently wound a few too many warp threads, so I FILLED my 45" floor loom, each dent was occupied. That meant I also used 540 heddles! Whew!
I did plainweave, with blue up in one shed and green up in the next. Simple and fast! Once the loom was prepared, I finished weaving this in less than 4 hours.
Now Manos Del Uruguay hand dyes their yarns, and I realized after starting that there was a hue difference between the 2 skeins I was using. I alternated skeins on two shuttle bobbins, but another point of improvement would be to alternate those two bobbins ROW by ROW to better merge the colors.
But there is the finished project. It ended up 45"x43", and is soft and colorful. I made 4" twisted fringe at each side, and it's beautiful.
Yeah, I should have pressed it before this picture....but I didn't. Lazy, lazy...I know.
I hope this baby boy will use this up through childhood and wear it till it has holes! It sure was fun making it!
I'd seen a lot of really stunning blankets using a single our dual colored warp combined with a variegated weft, so I decided to give it a try. I found this beautiful colorway (Agua) in Manos Del Uruguay Maxima (100% wool, single ply) :
and found two colors of 3/2 cotton to match. In retrospect, I would have picked two colors that were slightly more different, because I think it's hard to see the difference between the blue and teal. But it's still pretty!
I was shooting for a 40"x40" receiving blanket size, but inadvertently wound a few too many warp threads, so I FILLED my 45" floor loom, each dent was occupied. That meant I also used 540 heddles! Whew!
I used a 12 dent reed, and I think if I were to try to make this better, I would thread it with a 10 dent. The warp could have been farther apart to let the weft really shine.
I did plainweave, with blue up in one shed and green up in the next. Simple and fast! Once the loom was prepared, I finished weaving this in less than 4 hours.
Now Manos Del Uruguay hand dyes their yarns, and I realized after starting that there was a hue difference between the 2 skeins I was using. I alternated skeins on two shuttle bobbins, but another point of improvement would be to alternate those two bobbins ROW by ROW to better merge the colors.
But there is the finished project. It ended up 45"x43", and is soft and colorful. I made 4" twisted fringe at each side, and it's beautiful.
Yeah, I should have pressed it before this picture....but I didn't. Lazy, lazy...I know.
I hope this baby boy will use this up through childhood and wear it till it has holes! It sure was fun making it!
Thursday, July 17, 2014
A mountain get-away
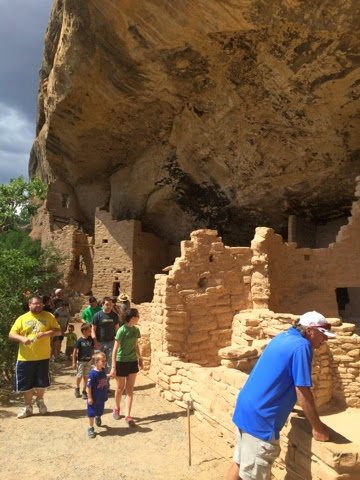
My in-laws planned and invited us to a week-long vacation in Durango, Colorado. I have been to many parts of Colorado, but never the southwest part. It was beautiful! This picture is in New Mexico, north of Albuquerque.
On the way up, we stopped at Capulin Volcano in northwest New Mexico and hiked to the crater.
We also stopped at the Continental Divide and did a quick mile hike.
Our first day in Durango was spent exploring the fish hatchery:
...and playing in the beautiful local parks:
Day two included a ride on the historic Durango-Silverton narrow gauge railway. We received a great tip from locals and split our group of 14 in half - 7 on the train up, the other half driving up and then we switched places. It made the 3 hour (each way) journey very doable with littles. It was a beautiful, scenic ride:
The next morning we pulled camp and drove the 12.5 hours back to Oklahoma. It wasn't a super-fun trip, since the only stops were gas, potty and food, but I got a lot of knitting done on Elijah's Spider-Man blanket!
Monday, June 30, 2014
Kid craft
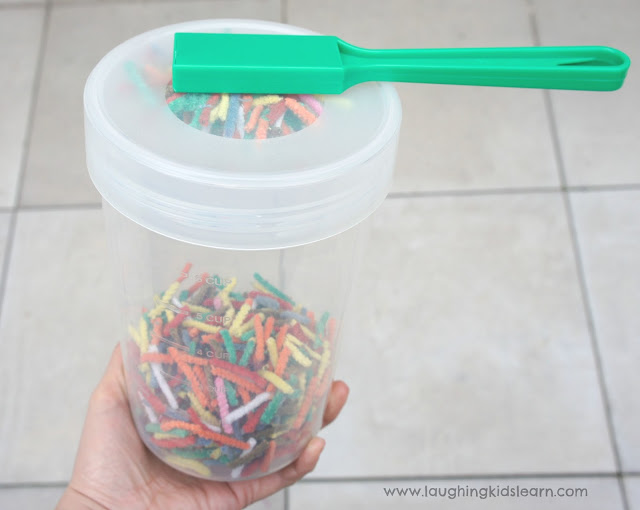
As I've mentioned, we are going on a road trip to Durango, Colorado next week. I have been slowly gathering things for the 12+ hour drive for the last few months. When I sat down to think of things to have to help keep the kids entertained, I came across this page describing a jar of pipe cleaners she gave to her kids to help teach them about the science of magnets.

I took it a step farther.
First I found a nice plastic container. Now in my family, we eat nuts like there's no tomorrow. It's not unheard of for me to buy 8-10 of them when there's a good sale. So when we empty one, I take the labels off and stash them in my craft closet. They're really handy for all sorts of stuff.
So I have 2 Planters peanut jars, next I went and found a variety of metallic items. I let the boys pick 3 colors of pipe cleaners, and cut them into small bits like the example above. Then I found other magnetic things, like paper clips, bobby pins, spare screws and nuts, and a few other miscellaneous items.
Once I added all the items, I hot-glued the lid on so we wouldn't have bits all over the car floor. Next, I hot-glued a magnet to a large Popsicle stick so the kids can move things around and see how it affects the contents of the jar. Here is a photo of my son making the items crawl up the side of the jar.
And across the bottom.
He played with it for several hours before I confiscated it to put away for the trip. It'll lose it's novelty if they keep playing with it until then. One of those things mommys learn along the way!
As it gets closer, I get more and more excited and less concerned about how the boys will do. Vacations are supposed to be fun and as long as you expect some rough patches and plan accordingly (with frequent stops and distractions), it'll work out fine!

I took it a step farther.
First I found a nice plastic container. Now in my family, we eat nuts like there's no tomorrow. It's not unheard of for me to buy 8-10 of them when there's a good sale. So when we empty one, I take the labels off and stash them in my craft closet. They're really handy for all sorts of stuff.
So I have 2 Planters peanut jars, next I went and found a variety of metallic items. I let the boys pick 3 colors of pipe cleaners, and cut them into small bits like the example above. Then I found other magnetic things, like paper clips, bobby pins, spare screws and nuts, and a few other miscellaneous items.
Once I added all the items, I hot-glued the lid on so we wouldn't have bits all over the car floor. Next, I hot-glued a magnet to a large Popsicle stick so the kids can move things around and see how it affects the contents of the jar. Here is a photo of my son making the items crawl up the side of the jar.
And across the bottom.
He played with it for several hours before I confiscated it to put away for the trip. It'll lose it's novelty if they keep playing with it until then. One of those things mommys learn along the way!
As it gets closer, I get more and more excited and less concerned about how the boys will do. Vacations are supposed to be fun and as long as you expect some rough patches and plan accordingly (with frequent stops and distractions), it'll work out fine!
Saturday, June 28, 2014
Summer days
It's been a great summer so far. The weather hasn't been to hot, we've had a lot of rain, the boys are loving playing outside, and we have had (and still have upcoming) great vacations this year. We spent a week at Tablerock Lake/Branson with my family, and we are planning on leaving next week for a week in Durango, Colorado. I'm excited. The boys ride well in the car these days, and are nearly both potty trained - which helps a lot. I'm sure vacations from this point on will be a lot of fun!
I've not posted in a while, but that doesn't mean I haven't been busy with fiber. A quick update: I have the cream and blue kitchen towels on my largest loom:
I'm over half way done with the second towel. The pink line seen is my cutting line, where I will machine sew the end of the towels on either side and then cut them apart. Each towel will have the same coloring but has a different treadling pattern. The first towel was plain 'ole twill. The second one is an extended zig zag. Here is a close up of the design:
Although my kids bug the tar out of me when I'm trying to weave - touching this and that and walking off with my tools, I really love weaving and hope as they get older I will be able to devote more time to it. It's so satisfying to spend an hour at the loom and end up with 10 inches of fabric, even at small gauge. Much different than knitting in that way.
It's knit in the round with a spiral pattern.
I've not posted in a while, but that doesn't mean I haven't been busy with fiber. A quick update: I have the cream and blue kitchen towels on my largest loom:
I'm over half way done with the second towel. The pink line seen is my cutting line, where I will machine sew the end of the towels on either side and then cut them apart. Each towel will have the same coloring but has a different treadling pattern. The first towel was plain 'ole twill. The second one is an extended zig zag. Here is a close up of the design:
Although my kids bug the tar out of me when I'm trying to weave - touching this and that and walking off with my tools, I really love weaving and hope as they get older I will be able to devote more time to it. It's so satisfying to spend an hour at the loom and end up with 10 inches of fabric, even at small gauge. Much different than knitting in that way.
I have finished 3 projects to share with you in knitting. They were each quick things that I finished. First up is my Hat in Pinks.
This yarn is some that I've had for forever, three partial skeins, and I finally just made a simple hat with them. Bernat Cottontots in 3 pink colors. It is a discontinued line, which is sad, because I like the yarn a lot. It is really soft and easy to work with. I really like how the variegated yarn created stripes in the middle section.
Next up is a wine bottle cozy. The idea for this arose out of our summertime Sunday evening Twilight Concert series in the park that we like to go to.
We began going 3 years ago with our neighbors, and it became imperative (*wink, wink*) to bring a bottle of wine along. Now tell me how, exactly, we should carry a bottle of wine and glasses to the park along with blankets, snacks, strollers, sippy cups and the like WITHOUT breaking the bottle?? So as a crafter will do, I picked up some Alpaca Love, Stitch Nation by Debbie Stroller, and started in.
This was fun to knit, quick, and easy. All you got to do is slide in your wine of choice and tie it to snug in down, and you have wool and alpaca keeping that wine cold and protected. Very important. :) It's knit in the round with a spiral pattern.
So now my wine bottles are safe when I'm going to music in the park. Horray!
Last, is my Knotty Gloves. I really like these. This is Berroco Sox. If you ever need a great, sturdy, warm sock yarn, this is it. I made my dad a pair of simple wool socks from this same yarn and color, and he wears them all the time. But I went outside the box and decided to make a pair of gloves with the second skein I bought.
Self-striping yarn can be great, and it can be not so great. When you are working a detailed cable pattern, stripes can really detract from the pattern and make it less visible. This happened in the cabled knot on the gloves, but I'm still very happy with them. They fit great (I made them big for me - I have TINY hands), so hopefully they'll fit "normal" people. They'll be very warm and extend half way to the elbow, so that adds even more warmth. I love the stripes on the fingers. Gloves never cease to amaze me in their construction. How you can increase, decrease, place stitches on hold, and end up with such an oddly-shaped yet well-fitting thing is fantastic.
I have a pair of wrist warmers nearly done on one pair of needles and a baby blanket on the other. Here is a sneak peak of that:
And on my small loom, my placemats are SOOO close to done. I can taste it. I should go work on them now....
Off I go! Happy summer to you!
Subscribe to:
Posts (Atom)